
You recognize the importance of clearing the room of as much furniture as possible. You know that you should remove outlet covers, light fixtures if possible, etc. How do you protect the things you can’t remove from the room?
1) Gather the Materials
Drop Cloths
Use drop cloths to protect floors and furniture. Learn how to choose the right drop cloth for the job.
Tape
You want to choose the right type of tape for the job. Knowing the type of surface the tape needs to release from is important, especially for interior applications. You also need to consider how long the tape will be in place before you can remove it.
The beige-colored crepe tape, known as masking tape or regular painter’s tape, is the standard tape used to attach plastic or paper to most surfaces. It can be purchased in width from 3/4″ to 2″.
The adhesive is strong. This can make it difficult to remove the tape after a few hours. Exposure to sun or heat can make it very difficult to remove.
For situations where you know you are going to have to leave the tape in place for a while, blue painter’s tape is a better choice. It has an adhesive that is designed with low adhesion and safe-release properties. This can also be useful for surfaces that could be damaged easily if the tape sticks too strongly, such as on fiberboard ceiling tiles. The packaging will tell you how many days it can stay in place, though it is always best to remove as soon as possible.
Some paints, such as lacquers and enamels, dissolve most adhesives. In this case, you must use a tape that is resistant to solvents. Look for a tape that has good solvent resistance, otherwise the tape won’t provide the protection you are looking for.
Paper and Plastic
 You may be tempted to use newspaper but don’t. It not only disintegrates when it gets wet, it can leave ink stains behind. Use masking paper instead. If your job doesn’t include lacquer or enamel or a high-solvent finish, you can use the regular brown Kraft-paper rolls that are readily available at do-it-yourself hardware stores. If your paint is solvent based, you will want to use the more expensive green masking paper designed to resist solvents.
You’ll want to avoid the thin plastic film that’s on the market, unless you are using a hand held masking machine designed to dispense the film from the roll while applying the tape at the same time. Trying to work with thin plastic and tape is a frustrating experience, especially if you are working outdoors, trying to mask off a window. (The same hand held masking machine can also be used with paper rolls.)
Plastic masking film is heavier than most general purpose plastic films. This makes it easier to handle. It is available in several widths, from 24″ to 99″. Conveniently, this type of plastic is sized to fit popular window and door sizes.
 2) Choose What to Cover
You want to cover anything that you don’t want splashed, splattered, or dripped on.
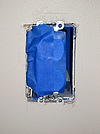
This means you’ll want to protect windows, doors, base, trim, cabinets and floors. You’ll want to cover the switches and outlets with blue painter’s tape after you have removed the covers.
3) Choose the Right Material to Mask With
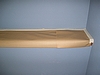
Trim
 You will find that 1-1/2″ beige or blue painter’s tape will provide the flexibility you need. It’s wide enough to attach to the edge of a drop cloth, paper or plastic. Press the tape firmly against the trim, apply slight pressure with a putty knife to create a good seal and prevent seeping. Wrap the tape around the door or window frame to help you cut in more cleanly.
Carpet
Use 2″ painter’s tape to protect carpeting along baseboards. Place the tape 1/2-3/4″ up the baseboard, then force the tape under the baseboard with your fingers. You’ll be able to quickly and easily paint the baseboard with a brush, without worrying about damaging your carpeting.
Windows and Doors
A strip of paper covering the top of your windows and doors will probably provide enough protection from splatters if you’re just painting the walls. More coverage is a good idea if your project includes painting the ceiling – especially if you have acoustic ceilings.
If you are using a paint sprayer, then you will need to cover windows and doors completely. Plastic is the logical choice. Apply 1-1/2″ tape and plastic using a hand held masking machine along the top of the window or door. Pull down the plastic and tack the bottom corners with two small pieces of tape. Next, tape the edges to the wall or trim, creating a tight seal. Be careful not to leave any gaps.
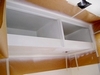
Cabinets
Completely covering windows, doors, and cabinetry is important if you will be spray painting. Plastic film is faster to apply than masking paper. Use a film dispenser to attach an appropriate length of plastic film to the top of the frame. If you are painting the adjacent wall with a roller, a strip of paper will usually provide enough protection.
Walls
If you’re painting the ceiling and don’t want to change your wall color, or if you need to protect an accent wall, drape the entire wall in plastic. Apply 1-1/2″ tape and plastic using a hand held masking machine along the edge of the wall where it meets the ceiling.If you don’t have a masking machine, you can apply the 2″ masking tape, leaving the bottom half of the tape free. Slide the plastic up underneath, then press firmly to adhere. Finish by sealing the side and bottom edges of the plastic. Be careful not to leave any gaps.
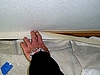
Ceilings
For smooth or textured ceilings (not acoustic) you can apply masking paper to protect from overspray if you’re painting walls. Attach wide masking tape along the perimeter of the ceiling, then, using a dispenser, attach 12″ masking paper to the tape. You’ll need to overlap the paper to ensure complete coverage.
Plastic masking film can be attached the same way, and provides better coverage than the paper does.
That’s what you need to know to do a good masking job. If you take the time to properly protect your work area, it will save you hours of frustration and touch-ups!
Special Situation: Spray Painting
 Tight seals and complete coverage are essential when spray painting.
Take time to make sure tape is securely attached and there are no open seams or gaps in the masking paper or plastic film.