
 With the cost associated with replacing a front door being very high, refinishing a door quickly becomes a viable option. This is a very good and doable project for the do-it-yourself home owner. Before beginning this project evaluate what the door needs to look new and your own abilities.
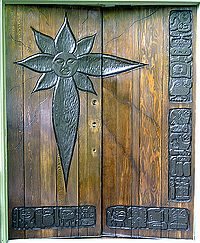
The custom exterior wood door on this and the following pages was refinished by Crowder Painting. To accomplish this project my brother and I first took a good look at the doors and the types of finishes previously used. We found linseed oil, tinted Danish oil and varnish. This is a bad mix of products used over many years. Needless to say these doors were begging for a proper finish.
Once we figured out we were going to be removing a cocktail of finishes, a quick and easy stripping method needed to be devised.
 Using a stripper is an option. This will remove all finishes, if a strong stripper is used. This the most time consuming method. After stripping, the door will still require sanding.
- Sand off the finish is the option we used and one that many professional painters will prefer. This is faster than chemical stripping, but difficult or impossible with carved areas.
At this point you will need to decide which method will work best for you. A combination can be used if necessary. Refinishing a door is full of choices and this is the first one.
In order to keep the cost as low as possible the homeowner decided to leave the carved areas mostly untouched, without using chemical strippers. This will save time and have us concentrate on the sanding. So we started refinishing the door in earnest.
Click for More Details: Part 1 – Starting the Process of Refinishing the Custom Wood Doors
Initial Preparation
Before beginning the process of refinishing a door, a couple of things need to be done. The door needs to be prepared. First remove the locking mechanisms including the striker and dead bolt. Loosely reassemble these items so no parts are lost and set aside.
Now remove any remaining accessories. This includes door kicks, knockers and viewers. If an item can’t be removed then it must be protected with making tape and paper. The final items are the hinges. Save all these items for re-installation later.
Now that the doors are ready the frames need a little work. If possible remove the weather stripping. The freshly refinished door could stick to soft rubber weather stripping and damage the finish. Reinstall after the finish has fully dried, typically 2-3 days.
Remove the Finish by Sanding
 At some point while refinishing a door the old finishes and stain will have to be removed. We decided to use power sanders and aggressively remove the old coatings. The types used are a random orbital sander and palm sander with hand sanding at the end. The following is the steps we used to prepare this custom exterior door system for staining.
- Began with 80-grit sanding disks on the rotary sander. This very rough grit that quickly removed the old finishes.
- Continued sanding using progressively finer grits. From 80-grit to 120 to 150. Make sure the scratches from the previous sanding grit is completely removed and replaced with the new finer pattern before changing to a new finer sanding grit.
- Changed from the rotary sander to a palm sander. The palm sander will remove any dips created by the rotary sander. Began with 150-grit and progressed to 180-grit. By now the scratch pattern is too small to see.

After the power sanding comes hand sanding. With these doors we used a combination of block sanding on the large flat areas and sponge sanding inside the carved recesses. The hand sanding is for triple checking the surfaces. No large scratches can remain before staining. The carved areas had some loose finish which was removed with sanding sponges.
A few more words about sanding before we continue refinishing a door, this door is solid wood and as such can withstand an aggressive sanding. If it was covered with a wood veneer, sanding would be very problematic. In this case using a chemical stripper is best. Follow the stripping with a light sanding using 150-grit paper then 180-grit. Be careful not to sand to deep. The veneer can be damaged if the sanding in to excessive.
Click for More Details: Part 2- Sanding the Wood Doors
Staining
 Applying a wood stain is optional. If you like the look of the door after the stripping and sanding is finished simply move on to applying a protective clear finish. For this customer refinishing a door included the application of wood stain. It definitely makes this custom exterior door look great.
A gel stain with a rich color was chosen. Any type of stain can be used depending on the look you are after. The gel stain was applied without any pre-stain conditioner. For more control on very soft woods and veneers use a pre-stain conditioner.
The stain was applied with the doors installed. This way we didn’t have to handle the doors after staining. Once the stain was applied it was allowed to dry for a couple of hours before installing the lock. Since the weather stripping was removed the doors were closed and locked at night.
Using a gel stain is easy and straight forward. Use quick deliberate brush strokes in the direction of the wood grain. Start each application 2-3 inches away from a previously stained area. Then work the stain toward the previously stained wood. Use small amount of stain and blend as you go.
We started staining the carved areas first then worked from the top down. Always start with the difficult areas first, such as windows and raised panels. Then tackle the styles and rails. A similar approach will be fine for most door styles.
Click for More Details: Part 3 – Staining the Wood Doors
Applying the Clear Finish
 The final step involved when refinishing a door is apply a clear protective coating. This is a two or more coat process with light sanding between each coat.The easiest application method is brushing with the doors installed.
A marine spar varnish with a satin sheen was selected for its ease of application and resistance to the weather. The end result is a set of beautiful doors
We began applying the varnish with brushes to the carved areas first, and then progressed to the styles and rails. Always brush a finish in thin coats and in the direction of the wood grain.
Click for More Details: Part 4 – Applying a Wood Varnish
Final Thoughts about Refinishing a Door
Tackling any refinishing project can be a very involving job for the professional painter. That is why the cost can seem high. This makes refinishing a door a very good DIY project.
This project took a total of three days from the start to the final coat of varnish. Each day was just a few hours with the remaining as drying time. The first day took the longest with the sanding and staining. With taking advantage of good weather and planning, it is possible to refinish a door in one weekend if a fast drying finish is chosen, such as water based polyurethane.