Many wood species have a great look without adding color, so staining wood is optional. If you like the natural colors of the wood simply move on to applying the finish. Stain can change the woods color and appearance to match any decor or desire you can conceivably have.
Once you start staining wood two problems may occur. The first problem I often encounter is staining a large amount of trim or doors efficiently. Applying the color and finish to the base, casing and doors of even a small home will be time consuming. The second problem is the stain might come out uneven with light and dark areas.
Fortunately there is a solution or two for each of these issues.
The type of stain used will directly affect the outcome of your project. There are three types of pigmented stains. Oil-based stains are pigments suspended in a resin/solvent mixture, similar to a thin oil base paint. Water-based stains are similar to thinned latex paint, with the pigments suspended in a resin/water mixture. Gel stains are pigments suspended in a paste that changes from a solid to a liquid as you wipe it on the surface.
All of these wood stains are easy to apply. The type you choose depends on the amount of wood to be stained and type of project.
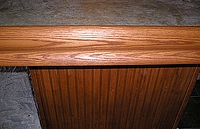
Oil base wiping stains dry slowly, 24 hours, allowing greater control over the final color. Water base stains dry quickly allowing wood staining and finishing in one day, they are best used for smaller projects.
Finally gel stains, this the most interesting type of stain on the market. Can be used on a variety of projects from wood doors to faux finishes, best when staining wood or surfaces with a problematic nature.
- Trim Packs – Whole house wood trim packages consisting of pre-hung doors, base, casing and windowsills. For large wood staining projects I use oil-base wiping stains.
- Small Projects – From a single door to a mantle. Any of the three stain types can be used, but oil base wiping stain or gel stain are the easiest to apply. If the project needs to be done in one day use a water-base stain and finish system.
- Fiberglass Doors – The only stain that really works is a gel stain.
- Veneers and Plywood – Gel stain is the best for these difficult surfaces, but any stain can be used if pre-conditioned first. Test a small hidden area before proceeding.
Before making the final decision about your choice of stain color, apply the stain to a scrap piece of wood that is equivalent to the type of wood used for your project. This stain sample will show the color and penetrating characteristics of the wood. Jumping into the project without a sample is risky.
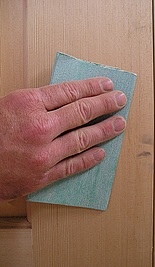
Now you have your color chosen and the stain purchased, but you’re not ready yet. Give the wood a good close look and sand if necessary. Sanding the wood is the best preparation you can do and must be done before beginning a wood staining project.
Occasionally the wood will look and feel perfect but once the stain is applied scratches or greasy fingerprints become evident. At this point you will have to allow the stain to dry and start over. Sanding all the stain off.
Staining wood after a meticulous sanding is your best defense against re-sanding and the effort involved with removing the fresh stain.
Achieving an Even Color
One of the major problems encountered when staining wood is an uneven color or blotched appearance. This is caused by uneven stain penetration. The natural state of kiln dried wood is a variation of hard and soft areas. This adds to the woods overall beauty, but will cause the color of the stain to be uneven.
Fortunately there is a solution, pre-seal the wood before staining. Use a to guaranty even coloration. Conditioning the wood adds a small amount of time and effort to the job and saves you from a possible wood staining disaster.
Not all woods need to be pre-conditioned. Usually the soft woods like pine and fir benefit the most. If you are unsure err on the side of caution. Using the conditioner won’t harm the stain or the outcome. At most the color will be light. Just add another coat after the first has dried.
Pre-stain conditioners are designed for use with either water base or oil base stains. Use a water base conditioner with water base stain and an oil base conditioner with oil base stains. Follow the manufactures directions as each brand may be slightly different.
Staining Wood Efficiently
The techniques used to apply stain to a woods surface depends on the type of stain to be used and type of object to be stained. The amount or volume of wood objects also affects the technique used. Generally, three techniques are used. These are applying with a rag, brush or pad and spraying. Wood stains can be applied then left to dry or wiped with a rag to remove any excess and control the depth of color.
Staining wood with a rag is best suited for small projects that have large flat areas. The best stain for rag application is an oil base wiping stain. Application is very simple. Use a clean white cotton rag wet with stain and rub in the same direction as the wood grain. Circular motions can be used, but always end in a straight line parallel to the grain. Apply the wood stain liberally and allow soaking for a few minutes, removing remaining stain with a clean rag.
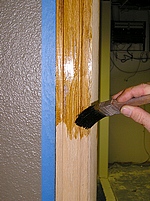
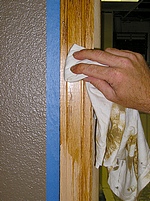
Staining wood with a brush or pad is similar to using a rag. Any type of stain can be brushed.
Use a for oil base stains and a nylon brush for water base stain. Apply the stain liberally in the direction of the grain and remove the excess with a clean rag. This applies to both oil base wiping stain and water base stains.
Oil base gel stains are different, removal of any excess with a rag is difficult. In this case use a rag and mineral spirits to control the color or remove excess. Be careful as light spots can develop if too much mineral spirits are used or excessive pressure is applied. It’s best to apply gel stains thinly, adding another coat if the color is to light.
Another application technique, one I use for large amount of base and casing, is staining wood with a or worn roller cover. Cut the roller in half with a hand saw, now you have two stain applicators. Simply dip the roller into the stain and rub down the trim. Allow to soak for a few minutes and remove the excess with a rag. Change to a new rag once it becomes soaked with stain. It’s possible to stain a very large amount of trim in just a few hours.
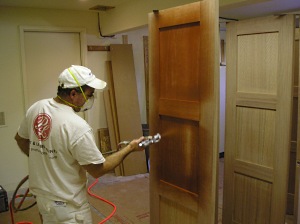
Staining wood by spraying is your last option. This requires a different set of skills. Although stain is very thin and easy to spray with any type of sprayer, it is possible to apply to much to fast. Now you have to work twice as hard and use a pile of rags in order to remove the excess.
A few rules I follow when staining wood with an airless sprayer.
- Use the smallest spray tip possible. A fine finish tip, 210 or 310, is needed.
- Adjust the pressure to be as low as possible and still have a good fan without fingers.
- Thin the stain. Even though the stain is very thin right out of the can you might need to dilute it in order to have proper control of the color. This depends on the stain and the type of wood. Soft woods benefit the most. For pine and fur I dilute the wiping stain 50%, 1 part stain and 1 part mineral spirits. Hardwoods don’t require any thinning. Water base stains will need some thinning as well.
- Use multiple thin coats instead of one thick coat. The idea is to minimize any wiping. If a heavy area develops use a brush instead of a rag. Move the stain around to lighter areas and blend with the brush.
Another option is to use an . The same basic rules apply, but this type of sprayer will give greater control. The down side is an HVLP sprayer will be slower, applying even thinner coats.
My preference is the airless paint sprayer. Staining wood with an HVLP sprayer is best suited for small projects with multiple angles and the airless for large jobs; example would be multiple doors and a lot of trim. Spraying can be much faster and easier than any other method, but some experimentation is needed before proceeding.
Safety Issues
Staining wood has a few hazards that you need to be aware of. Most concerns are from using oil base stains.
- These products are flammable and rags soaked with stain can self combust. To avoid any unfortunate events put all used rags into a bucket filled with water. The rags can be put into the trash can on the scheduled pick-up day and hauled away.
- Another concern is fumes. Always supply good ventilation and never apply oil base products near open flames. This includes pilot lights and smoking.
- Keep these chemicals away from children. Stains are poisonous when in a liquid form.
- Prolonged exposure to the skin should be avoided. Use nitrile gloves and protective clothing.


