The success of any job depends on using the correct tools. This section contains everything you need to know about wallpapering tools, whether you’re hanging new paper or stripping off the old.
Hanging Wallpaper
Surface preparation – Most walls need some repairs or other preparation before they can be papered. Repairing dents, dings, and even holes in the drywall or plaster is easy with spackling paste and a good putty knife. Buy two sizes: 3″ and 6″. A sanding sponge is comfortable to hold, and proper sanding will ensure a perfectly smooth surface to apply the wallpaper to.
Patched areas need to be sealed with primer. Choose a high quality latex primer. A paint pan and a roller with a low to medium nap complete the surface preparation toolkit.
Measuring – Accurate measuring is critical. A measuring tape should be all you need to determine a room’s dimensions. You can also use it to find the wall’s center point and to determine where cuts need to be made. A level will help you accurately position wallpaper. Use a yardstick as a straightedge to ensure accurate cuts, but allow 4″ on each strip to allow for pattern matching.
Marking – Mark the wall where you’ll hang your first sheet. Use an ordinary pencil for horizontal lines, and a chalk line for vertical ones.
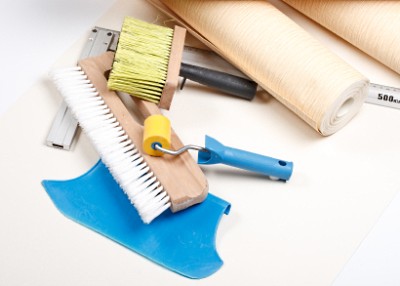
Wallpaper Prep – Wet prepasted wallpaper strips in a wallpaper tray. Wallpaper scissors, created just for cutting wallpaper, are long and great for precice cuts.
For wallpaper that isn’t prepasted, several other tools are necessary. A wallpaper table has many advantages: it provides a surface for spreading adhesive and booking, and keeps the paper off the floor, where it might get stepped on or otherwise contaminated. Many are nick-resistant, making them a suitable surface for measuring and cutting, too. Look for one that is lightweight and easy to maneuver.
Spread the adhesive over large sheets of wallpaper with a paint roller. Smaller pieces can be glued with a paste brush.
Application Tools – You’ll want to have at least one bucket handy. Fill it with water and a clean sponge; wipe up smears of adhesive as you go.
Use a smoothing brush to work out bubbles and wrinkles. The type you’ll use depends on the type of paper you’re hanging. Short bristled brushes are best for sturdy vinyl papers, while long bristled brushes are better for more delicate papers. Use a smoothing knife in the corners.
Seal seams with a seam roller. Only roll seams once or twice; too-vigorous rolling will force out too much adhesive and make a mess. It will also flatten embossed wallpaper and weaken the seam.
For accurate cuts, use a broad-knife to hold the paper in place, then trim with a utility knife. The kind with snap-off blades is best; cutting wallpaper dulls knives quickly.
Removal/Stripping Wallpaper
Moisten and soften old wallpaper for removal by misting it with a spray bottle or wiping it with a damp sponge. Commercial wallpaper stripper contains enzymes that dissolve wallpaper paste. Combine it with hot water and use it to moisten the wall covering.
In many cases, especially with vinyl wallpapers, the moisture won’t be able to penetrate the wallpaper’s decorative surface. Using a wallpaper scoring tool to make tiny holes in the paper will allow the moisture and stripper to penetrate, loosening the adhesive.
Once the adhesive begins to loosen, you’re ready to begin scraping. Use a special wallpaper scraper, or re-purpose your 3″ and 6″ putty knives.
Wallpaper removal is a messy job. Garbage bags can hold the worst of the paper debris. Keep a bucket of warm water and plenty of rags handy to wipe up dissolved adhesive. You’ll also need them to wash down the walls once the old paper is off.