
A critical part of any paint job, especially exterior ones, is caulking. Gaps and cracks are your home’s worst enemy! Not only do they reduce energy efficiency by creating drafts, but they allow pests and moisture easy access.
Moisture is one of the greatest causes of problems. If water gets under the paint, your paint job will peel, bubble, crack or chalk. Ugly mold or mildew may develop, causing health problems.
The best way to prevent all these problems is by carefully sealing gaps and cracks with a high quality sealant.
Choose the Right Materials and Tools
Elastomeric caulk is one of the best sealants; It is flexible, adheres to any surface, and lasts a long time. It can also be cleaned up with water. Other good candidates are polyurethane sealants and standard siliconized caulking.
Choosing the right caulking gun will make the application process much easier.
Areas to Caulk
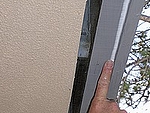
In some places, it will be obvious where caulking is needed. It’s important to fully seal the entire home! A good rule of thumb is to apply a bead of caulk anywhere two dissimilar materials meet – brick and wood; wood and glass; wood and metal, etc.
Window Caulking Tips
Caulk window trim at the top and sides. Leave the bottom unsealed. This will prevent dripping and windblown water from entering the building while allowing condensation to escape. Also leave the weep holes unsealed.
Untrimmed windows require a bead of sealant around the entire window. Placing tape on the window, 1/8″ away from the gap will help assure a straight, professional-looking bead. As you become more experienced with the caulk gun, masking the window won’t be necessary. Clear elastomeric caulk is less visible than the white variety but provides the same benefits. Don’t be alarmed if it goes on white! It will become transparent as it dries.
Wood windows usually consist of more pieces. This produces more gaps. All will need sealing. Any place where two pieces of wood join together needs caulk. Here are the typical areas you need to check.
- The header, or top trim. This can be two or more pieces of wood.
- The trim. Usually a single piece, you need to caulk where the trim meets the siding, the header and the sill.
- The sill. This can also consist of multiple wood pieces. Pay special attention to these gaps.
- The glass and wood edge. This interface can allow water between the glass and wood frame causing peeling and possible rot. Apply a small bead of paintable clear caulking were these two materials meet. The clear caulk can be applied after the window sash is painted. This will allow you to paint the windows a bit faster without having to worry about brushing a perfectly straight line.
Door and Frame Caulking Tips

All doors (entries, garage doors, and pet entries) need special attention. Problems are common where the door frame meets the threshold. A thin bead of caulk can prevent water damage here. Also caulk the areas where trim meets the door frame or siding.
In garages with concrete floors, the frame can soak up moisture from the floor, causing peeling and dry rot. Prevent this by applying a small bead of clear caulk (it’s less obvious than white). Paneled entry and garage doors require a very good seal. All panels must be caulked after any sanding and priming has taken place. This includes any panels on wood and masonite garage doors.
Soffit and Fascia Board Caulking Tips
These areas are easy to overlook because they’re so high off the ground, but attention to detail now will pay off in the long run. Caulk behind the fascia boards for a neat, finished appearance. It will also extend the life of your soffit and fascia boards.


Brick and Concrete Caulking Tips

Brick, concrete, and stone may seem impervious to water, but caulking anywhere wood siding meets the siding is critical.
Use clear caulk. White caulk on brick or concrete looks terrible. If you have any large gaps in the concrete, consider using gray urethane or siliconized acrylic concrete caulking.
For new homes or areas that have never been caulked, apply the clear caulking after the painting is finished. This will make the painting easier and produce a better looking paint job.
4 Responses
It is very important to remember to caulk. I see so many people that do not even know that you have to do this.
I live on the 11th floor of a building. My windows are floor to ceiling, hurricane resistant, I live in FL. I need to caulk outside windows, for example, water pours in like a faucet from a screw located on top of frame straight into ceiling. Any suggestions?
Do I caulk where the last run of cedar boards meets the ground (driveway and patio)?
THXS Michael
Yes, this would stop wicking water into the siding and causing peeling and rot.