Wood graining is a faux finishing technique that can transform nearly any surface into the warm, rich beauty of wood. From metal doors, to kitchen cabinets, once you master the technique of wood graining, the possibilities are endless.
Most often, faux wood graining is created by using a tool to manipulate wet glaze or wood stain on a piece of furniture or wall. To create the most realistic wood grain, you need to arm yourself with the proper wood graining tools. Let’s learn about what tools will help you achieve the faux wood grain finish you desire.
The 6 Main Wood Graining Tools

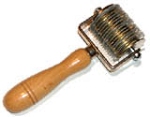
Check roller.
Generally speaking, oak and mahogany are porous woods. A check roller is an excellent tool to use to replicate the look of porous woods. It can also be used to add background texture.
The check roller comes in different widths (4″ is especially popular for its versatility.) The check roller has dozens of stainless steel plates that move independently of one another around a central piece of metal. This makes the design created by a check roller rather arbitrary.

Overgraining brush.
An overgraining brush is most often used to perfect the detail of the wood grain created with another tool. Overgraining brushes can be bought in sets that range from a very narrow brush to slightly wider brushes.
While the glaze on your furniture (or wall) is wet, you drag the brush through the glaze, creating “natural” imperfections. Some professionals will use an overgraining brush extensively when creating faux wood grain, but this takes a great deal of practice and finesse. Using an overgraining brush as your primary wood graining tool is not something I recommend for do-it-yourselfers.

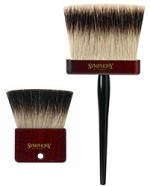
Softening brush.
A softening brush is usually made with animal hair. The bristles of a softening brush are set slightly apart. The primary purpose of a softening brush is to “soften” or smooth the lines of the faux wood grain, which gives your project a more realistic appearance.
Check combs.
Check combs are a bit easier to manage than some other faux wood graining tools, as you have more control over the effect that they produce. The comb is run through the glaze while it is still wet and creates the wood grain effect. You will often see triangular check combs that have different sized teeth on each of the three sides. This allows you to create various wood grain patterns with just one tool.

Wood grain rocker.
A wood grain rocker is likely the most frequently used tool to create faux wood graining. You “rock” the tool through wet glaze as you pull it across your piece of furniture or along a wall. A wood grain rocker is made of durable rubber that has wood graining and sometimes knots on it. You can use more than one wood grain rocker, or simply vary the speed at which you pull and rock one wood grain rocker to produce a diversity of wood graining effects.
Wood grain roller.
A wood grain roller is very similar to a wood grain rocker. The critical difference is that the roller is of course “rolled” through wet glaze as opposed to being rocked and pulled through glaze. One advantage of a wood grain roller over a wood grain rocker is that rollers often come with detachable handles, so the cylinder (or roller) can be changed to a different wood grain pattern. This allows you to create an abundance of wood graining effects.
Choosing Wood Graining Tools for the Job
The first step in choosing which faux wood graining tools is right for you is determining what type of wood grain you want to replicate. Oak will require check combs, for example. Birch won’t.
You may choose to use one tool, such as the triangular comb; or you may decide to pair the wood grain rocker with the smoothness offered by the softening brush. Either way, the key to wood graining success is practicing with a few different tools on a piece of scrap wood. Faux wood graining makes for knock-out results, but it demands that you take your time.
Depending on the wood you wish to copy, you may need all of these tools or just one or two. The amount of detail that goes in to making your surface as realistic as possible is completely up to you. Being creative and choosing the colors and methods you think will look best is key to creating a wood graining faux finish you are proud of.


6 Responses
Hello
I am trying to paint my concrete to a wood look and like the look of pine. Do you have any suggestions for what I should use? Thank you, Vinita
Being concrete you will need to smooth the surface with patching compound then seal it with a good acrylic primer. A background color of paint will need to be applied, a satin sheen is best. The idea is to produce a fairly smooth and sealed surface for the wood graining. After all of this work the gaining can take place.
I would use the glaze method for a large surface. Follow the instructions in this article, https://www.house-painting-info.com/articles/faux-oak-wood-grain-2/. It might be best to think of this as stripes and use tape to make a plank look. This will take some experimentation to get right but could be a really cool look. Let us know how it goes and take pictures.
I would like to paint my industrial/commercial slab metal door with a faux wood finish. The base color is a light grey any tips, hints, or suggestions you may have in reference to what steps I should take after scuffing?
Here’s a good video –Wood Graining a Painted Door and here is a detailed article that will give you all info needed – Oak wood graining using stain.
I want to redo my utility room with a wood look on the lower half of the walls. It is painted a light taupe/gray and I want to have the lower half painted white with lots of wood grain showing through the paint. What graining tools would you suggest? I thought a darker gray applied in different stripes might be interesting.
Check out this article; Types of Wood Graining Tools